
Cannoli Cookies bring the delightful flavors of a classic Italian dessert into a deliciously portable treat. These cookies are perfect for satisfying your sweet tooth with their crispy, yet soft texture and rich, creamy filling. With their nostalgic charm and easy-to-follow steps, Cannoli Cookies are not only a comforting dessert but also a family-friendly recipe that everyone will adore. As you prepare to create this delightful dish, you’ll appreciate the process of crafting each component, from the luscious ricotta filling to the beautifully formed cookie tubes. Just imagine the aroma wafting through your kitchen as these cookies bake to golden perfection, making it well worth the effort for a delightful culinary experience.
Ingredients
The base of Cannoli Cookies lies in its delightful ingredients, each adding a unique sensory experience to the dish. Start with 30 ounces of creamy ricotta, the heart of the filling, which promises a delightful indulgence. To sweeten things up, add 1 cup of powdered sugar, bringing a light, sugary softness to the mix. For a touch of warmth and flavor, include 1 teaspoon of vanilla extract, which will elevate your filling. The cookie batter features ¾ cup of all-purpose flour, ¾ cup of sugar, 1 teaspoon of baking powder, and ½ teaspoon of kosher salt combined for a balanced sweetness, fluffiness, and subtle saltiness.
Next, it’s time for the wet ingredients: 2 eggs, ¼ cup of whole milk, and 3 tablespoons of melted and cooled butter. These moist ingredients come together to create a soft texture that’s chewy and gentle on the palate. Don’t forget the extra ½ teaspoon of vanilla extract for the batter, and for a decorative finish, have 4 ounces of melted chocolate ready for dipping the cookie ends, along with mini chocolate chips for a charming touch. Lastly, a light dusting of powdered sugar creates an elegant finish to your delectable Cannoli Cookies.
Step-by-Step Directions
To prepare your delicious Cannoli Cookies, start with the most critical component: the ricotta filling. Line a fine mesh strainer with cheesecloth, then place it over a large bowl. Spoon the ricotta into the cheesecloth, cover it with the ends, and let it drain overnight in the refrigerator—this step is crucial for achieving a rich and creamy filling!
Once your ricotta is ready, transfer it to a mixing bowl and sift the powdered sugar over the ricotta. Using a hand blender, mix at low speed until combined. Add the vanilla extract and whip on medium-high speed until the mixture is light and fluffy. For convenience, place your ricotta filling in a Ziplock bag and refrigerate it until you’re ready to assemble, ideally keeping it chilled for at least one hour or even overnight.
Preheat your oven to 325°F. In a medium bowl, mix together the flour, sugar, baking powder, and salt until well combined. In a separate bowl, whisk together the eggs, milk, and vanilla extract until smooth. Slowly incorporate the cooled melted butter and whisk again until fully combined.
Now, add your wet mixture to the dry ingredients, whisking until smooth. This cookie batter can be used immediately, or you can store it in the refrigerator for up to three days if you want to prepare ahead of time.
Line a baking sheet with a silicone baking mat or Silpat. For each cookie, scoop 1.5 to 2 teaspoons of the batter and shape it into 4 to 5-inch rounds on the mat—aim for about 4 cookies per sheet. Bake the cookies for 10 minutes, rotating halfway through for even baking.
Once baked, the cookies will be soft while warm. Immediately use a clean offset spatula to loosen each cookie from the baking sheet. Roll each warm cookie into a tube shape, about ¾-inch in diameter. Hold them in this shape for a few seconds or blow cool air onto them until they firm up. Transfer the rolled cookies to a plate or cooling rack and repeat the process until all the batter is used.
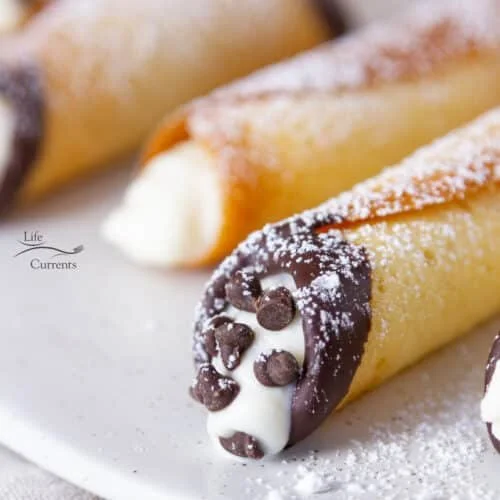
After all your cookie tubes are formed, dip the ends in melted chocolate if desired, and let them set. Move on to the filling: scoop your chilled ricotta filling into a piping bag or another Ziplock and snip the corner to create a filling nozzle. Fill each cookie tube gently, exploring the joy of seeing your creation come to life. To finish, sprinkle the ends with mini chocolate chips and dust the cookies with powdered sugar, creating an irresistible final presentation.
Tips & Tricks
- Use a high-quality ricotta: The fresher and creamier your ricotta, the better your filling will taste.
- Drain the ricotta thoroughly: This prevents a runny filling and keeps your cookies structurally sound.
- Experiment with flavors: Add a hint of orange or lemon zest to the ricotta filling for an interesting twist.
- Let cookies cool completely: Before filling, ensure your cookies are entirely cooled to maintain their shape.
- Store wisely: Keep unfilled cookies in an airtight container to retain crispness until you’re ready to enjoy them fresh.
Serving Suggestions & Pairings
Cannoli Cookies are delightful on their own, yet their flavors can be enhanced with delicious pairings. Enjoy these cookies with a freshly brewed espresso or along with an aromatic cup of tea. For special occasions, serve them on a dessert platter alongside traditional Italian delights like tiramisu and panna cotta. These cookies also make a great addition to holiday celebrations or family gatherings, encouraging sharing and enjoyment among loved ones.
Nutritional Information
Cannoli Cookies are a treat meant for moderation. Each cookie offers about 120-150 calories, depending on the size and ingredients. A single serving contains approximately 6g of fat, 15g of carbohydrates, and 2g of protein. While these cookies are delicious, remember to balance them with healthy meals throughout the day.
Storing Tips & Variations
You can store unfilled Cannoli Cookies in an airtight container on the countertop for up to 3 days. To fill, simply pipe in the ricotta filling just before serving to ensure they remain fresh and crunchy. For variations, consider adding chopped nuts, like pistachios or almonds, to the ricotta filling or experimenting with flavored chocolate for dipping. You might even try a dairy-free alternative by using coconut cream instead of ricotta for a gluten-free version!
Conclusion
Cannoli Cookies offer a wonderful opportunity to bring a taste of Italy into your home, one delightful bite at a time. With their combination of crispiness, creaminess, and a hint of chocolate, these treats promise to be crowd-pleasers at any gathering. We encourage you to dive into this easy and rewarding recipe, share your experience, and enjoy the smiles that come with every cookie crafted.
FAQs
-
Can I make Cannoli Cookies ahead of time?
Yes, you can make the cookie batter and shape it into tubes ahead of time. Store them in an airtight container until you’re ready to fill and serve. -
What should I do if my cookies are too soft?
Ensure that your cookies cool completely before attempting to fill them. If they’re still too soft, consider baking them a few minutes longer next time for a firmer texture. -
Can I freeze the cookies?
Absolutely! You can freeze the unfilled cookies in an airtight container for up to three months. Just let them thaw completely before filling. -
What can I substitute for ricotta?
You can use mascarpone cheese or cream cheese as alternatives for ricotta in the filling, but be mindful that flavors may vary. -
Can I personalize the filling?
Yes! Feel free to mix in flavors such as chocolate or fruit puree into your ricotta, or add spices like cinnamon for a unique twist.
Cannoli Cookies
Ingredients
Method
- Line a fine mesh strainer with cheesecloth, place it over a large bowl, spoon the ricotta into the cheesecloth, cover with the ends, and let it drain overnight in the refrigerator.
- Transfer the drained ricotta to a mixing bowl, sift the powdered sugar over it, and mix at low speed until combined. Add the vanilla extract and whip on medium-high speed until light and fluffy.
- Place the ricotta filling into a Ziplock bag, refrigerate until ready to assemble.
- Preheat the oven to 325°F.
- In a medium bowl, mix the flour, sugar, baking powder, and salt until combined.
- In a separate bowl, whisk together the eggs, milk, and vanilla extract until smooth. Slowly incorporate the cooled melted butter and whisk until fully combined.
- Add the wet mixture to the dry ingredients, whisking until smooth.
- Scoop 1.5 to 2 teaspoons of batter, shape into 4 to 5-inch rounds on a lined baking sheet, aiming for about 4 cookies per sheet.
- Bake for 10 minutes, rotating halfway through.
- Immediately use an offset spatula to loosen each cookie from the sheet, roll them into a tube shape, holding them in place until firm.
- Transfer the rolled cookies to a plate or cooling rack.
- Once all cookie tubes are formed, dip the ends in melted chocolate if desired, and let them set.
- Scoop the chilled ricotta filling into a piping bag and fill each cookie tube.
- Sprinkle with mini chocolate chips and dust with powdered sugar before serving.


Leave a Reply