
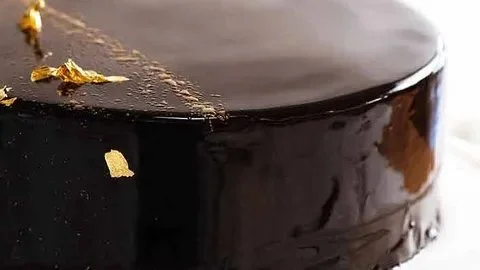
Chocolate Mirror Glaze is an enchantingly glossy topping that transforms your cakes into elegant masterpieces. With its rich, chocolaty flavor and ultra-smooth finish, it adds a touch of sophistication to any dessert. This mirror glaze not only looks stunning but is surprisingly easy to create. Whether you’re preparing for a special occasion or simply treating yourself, this recipe is a perfect blend of comfort and luxury. Follow this step-by-step guide to master the art of the shiny glaze that will impress everyone at your next gathering.
Ingredients
To create a luscious Chocolate Mirror Glaze, you’ll need the following ingredients:
-
1 x 20cm / 8" chocolate cake (2 layers): Rich, soft layers of chocolate cake serve as a luxurious base, providing a moist and flavorful foundation for the glaze.
-
2 batches Dark Chocolate Ganache: This divine mixture of dark chocolate and cream creates a rich and creamy layer under the glaze, enhancing the overall chocolate experience.
-
2 1/2 tbsp cold tap water: Keeps the texture of your glaze smooth and fluid.
-
4 tsp gelatine powder: A vital component for achieving the glossy finish, gelatine aids in thickening the glaze to the perfect consistency.
-
2/3 cup water: This will be combined with cocoa to create the base of your glaze.
-
2/3 cup cream (pure/regular whipping cream): Provides a creamy, velvety touch that enhances the glaze’s texture.
-
1 cup cocoa powder (unsweetened, sifted): The essential flavoring agent that gives the glaze its rich chocolate color and taste.
-
1 cup + 2 tbsp white sugar (caster/superfine): Sweetens the glaze beautifully, balancing the bitterness of the dark chocolate.
-
Gold dust and gold leaf (optional decorations): These luxurious accents can elevate your cake’s appearance to a whole new level, making it perfect for special occasions.
Step-by-Step Directions
Chilling and Preparing the Cake
To make your chocolate cake ready for the glaze, place the cake layers in the refrigerator for at least 1 hour to chill thoroughly. This step ensures easier handling. Once chilled, trim the cake to level it and frost it with the dark chocolate ganache. A smooth frosted surface makes a world of difference for the mirror glaze. For a detailed guide on frosting cakes smoothly, refer to our previous tutorial.
Blooming the Gelatine
To prepare the gelatine, start by placing 2 1/2 tablespoons of cold tap water in a small bowl. Sprinkle the gelatine powder over the water’s surface, ensuring it’s evenly distributed. Allow it to sit for about 5 minutes. During this time, the gelatine will absorb the water and take on a rubbery consistency—this process is known as "blooming" gelatine.
Whisking Cocoa and Water
In a medium saucepan, combine 1 cup of sifted cocoa powder with 2/3 cup of water. Stir the mixture until it forms a smooth, lump-free paste. This will be the base of your glaze, providing that rich chocolate flavor.
Adding Cream and Sugar
Next, add a small splash of cream to the cocoa mixture and stir gently until combined. Gradually add the remaining cream and the sugar, mixing gently to prevent air from entering the mixture. Avoid vigorous stirring or whisking at this stage, as we want to keep the glaze as smooth as possible.
Bringing the Glaze to a Boil
Heat the saucepan over medium-high heat, and as soon as the mixture comes to a boil, promptly remove it from the heat. This step is crucial, as boiling will enhance the flavors of the cocoa and sugar.
Dissolving the Gelatine
Add the bloomed gelatine lump to the hot cocoa mixture, gently stirring until it completely dissolves and you achieve a smooth, glossy glaze. Don’t worry if you see some white foam; that’s perfectly normal.
Straining the Glaze
Using a shallow bowl and a fine mesh strainer, strain the glaze into another bowl. Position the strainer so that the glaze has the shortest distance to fall; this helps minimize the formation of bubbles.
Checking for Bubbles
To ensure your glaze stays perfect, gently twist the bowl back and forth in your hands. This motion encourages any bubbles to rise to the surface, where you can easily remove them.
Cooling the Glaze
Cover the bowl with cling wrap, pressing it against the surface of the glaze to prevent a skin from forming. Allow it to cool on the counter for about 2 hours until it reaches a temperature of 30°C (86°F). If you’d like to make the glaze overnight, refrigeration is an option.
Second Straining
Right before you’re ready to pour the glaze over your cake, strain it once more into a jug. This extra step helps to catch any remaining bubbles.
Transferring the Cake
Once your cake has chilled and your glaze is ready, remove the cake from the refrigerator and carefully transfer it to a rack. Place a tray underneath to catch any excess glaze that drips off.
Pouring the Mirror Glaze
Start at the center of the cake and pour the glaze in a spiral motion towards the outer edges. Engage in a confident pour to ensure even coverage and a sleek, draped effect around the sides. It’s essential to work swiftly and without interruption for the best results.
Finishing Touches
If you notice any spots that need more glaze, use additional glaze from the tray to cover those areas. To smooth out any imperfections, use a warmed palette knife—lightly warming it with a blow torch or dipping it in warm water works wonders.
Slicing the Cake
Prepare a tall jug with warm water and dip your knife in it before making your first slice into the cake. Clean the knife, re-dip in warm water, and dry again. This technique ensures neat slices, allowing you to admire the stunning layers within.
Tips & Tricks
- To achieve a smoother glaze, make sure your cake is perfectly frosted before applying the mirror glaze.
- Keep the cream at room temperature before adding it to the cocoa mix, as this can help in achieving a smoother texture.
- Ensure that your spatula or palette knife is clean and warm for perfect slicing.
Serving Suggestions & Pairings
Chocolate Mirror Glaze makes a charming centerpiece for any celebration. Pair it with fresh berries, a scoop of vanilla ice cream, or opt for a sprinkle of sea salt on top to bring out the flavor complexity. This cake is perfect for birthdays, anniversaries, or even as a sumptuous dessert for an intimate dinner.
Nutritional Information
Each slice of cake provides approximately 350 calories, with a balance of fats, carbohydrates, and proteins. It’s essential to indulge in moderation, especially given its rich ingredients!
Storing Tips & Variations
To store, keep the cake in an airtight container in the refrigerator for up to 3 days. For longer storage, you can freeze the cake (preferably without the glaze) for up to 2 months. Variations can include adding flavors like peppermint extract to the ganache or experimenting with different chocolate types for the glaze.
Conclusion
Chocolate Mirror Glaze is not just eye-catching; it delivers an exquisite taste experience that your family and friends will adore. Don’t hesitate to try this recipe—your cake-making skills will impress anyone who lays eyes on your creation. Let us know how your mirror glaze turns out and share your beautiful cake photos!
FAQs
1. Can I use milk chocolate instead of dark chocolate for the glaze?
Yes, milk chocolate can be used for a sweeter glaze, but keep in mind the flavor and texture will vary.
2. How thick should the glaze be before pouring?
The glaze should be smooth and pourable, resembling a syrup-like consistency when it cools to the proper temperature.
3. Can I make the glaze in advance?
Yes, the glaze can be made a day before, then reheated gently until it reaches the appropriate pouring temperature.
4. What if I see bubbles in my glaze?
Gently warming the glaze while stirring can help reduce bubble formation. Straining before use is also crucial to achieving a perfectly smooth finish.
5. How can I ensure an even pour for the glaze?
Practice pouring steadily from the center outwards in a consistent motion. If using a jug, tilt it carefully to minimize the distance the glaze drops.
Chocolate Mirror Glaze
Ingredients
Method
- Place the cake layers in the refrigerator for at least 1 hour to chill thoroughly.
- Trim the cake to level it and frost it with the dark chocolate ganache.
- Sprinkle the gelatine powder over 2.5 tablespoons of cold tap water and allow it to sit for about 5 minutes.
- Combine 1 cup of sifted cocoa powder with 2/3 cup of water in a medium saucepan.
- Stir until it forms a smooth, lump-free paste.
- Add a small splash of cream to the cocoa mixture and stir gently.
- Gradually add the remaining cream and sugar, mixing gently.
- Heat over medium-high heat, and remove from heat as soon as it comes to a boil.
- Add the bloomed gelatine to the hot cocoa mixture, stirring until dissolved.
- Strain the glaze into another bowl using a fine mesh strainer.
- Twist the bowl gently to encourage any bubbles to rise to the surface.
- Cover with cling wrap and allow to cool for about 2 hours until it reaches 30°C (86°F).
- Strain the glaze once more into a jug right before pouring.
- Remove the cake from the refrigerator and transfer it to a rack, with a tray underneath.
- Pour the glaze in a spiral motion from the center towards the outer edges.
- Use additional glaze from the tray to cover any bare spots.
- Smooth imperfections with a warmed palette knife.
- Dip your knife in warm water before making your first slice.
- Clean the knife and re-dip in warm water for neat slicing.


Leave a Reply